
Bourbon Barrel Stout

After two weeks in the barrel, the first fill is complete! I now have a 2.5-gallon keg full of bourbon barrel aged Russian imperial stout. That is currently carbonating in the keezer and getting ready to enjoy. I intend to bottle some of it, but I have not decided the ratio of keg to bottle that I want to have quite yet.

Empty_Barrel

With the small barrel volume I wanted to be careful not to leave the beer in the barrel too long. I checked the beer every 3-4 days to check the flavor and aroma of the beer. After 3 days the aroma was already very strong. Bourbon character jumped out of the glass. The barrel character was barely perceptible in the flavor so it remained in the barrel. The aroma remained strong and the flavor slowly developed over the 2 weeks the beer stayed in the barrel. I feel good about the final beer result.

Since it seems that I cannot have anything go 100% smoothly when it comes to brewing I did have some drama at the end of the first aging. First was that I when I went to pull what would turn out to be the final sample the airlock was bubbling. Not exactly what you want to see when you are trying to age completely fermented beer. The second is that when I decided to pull the stout from the barrel I could not get a siphon started.

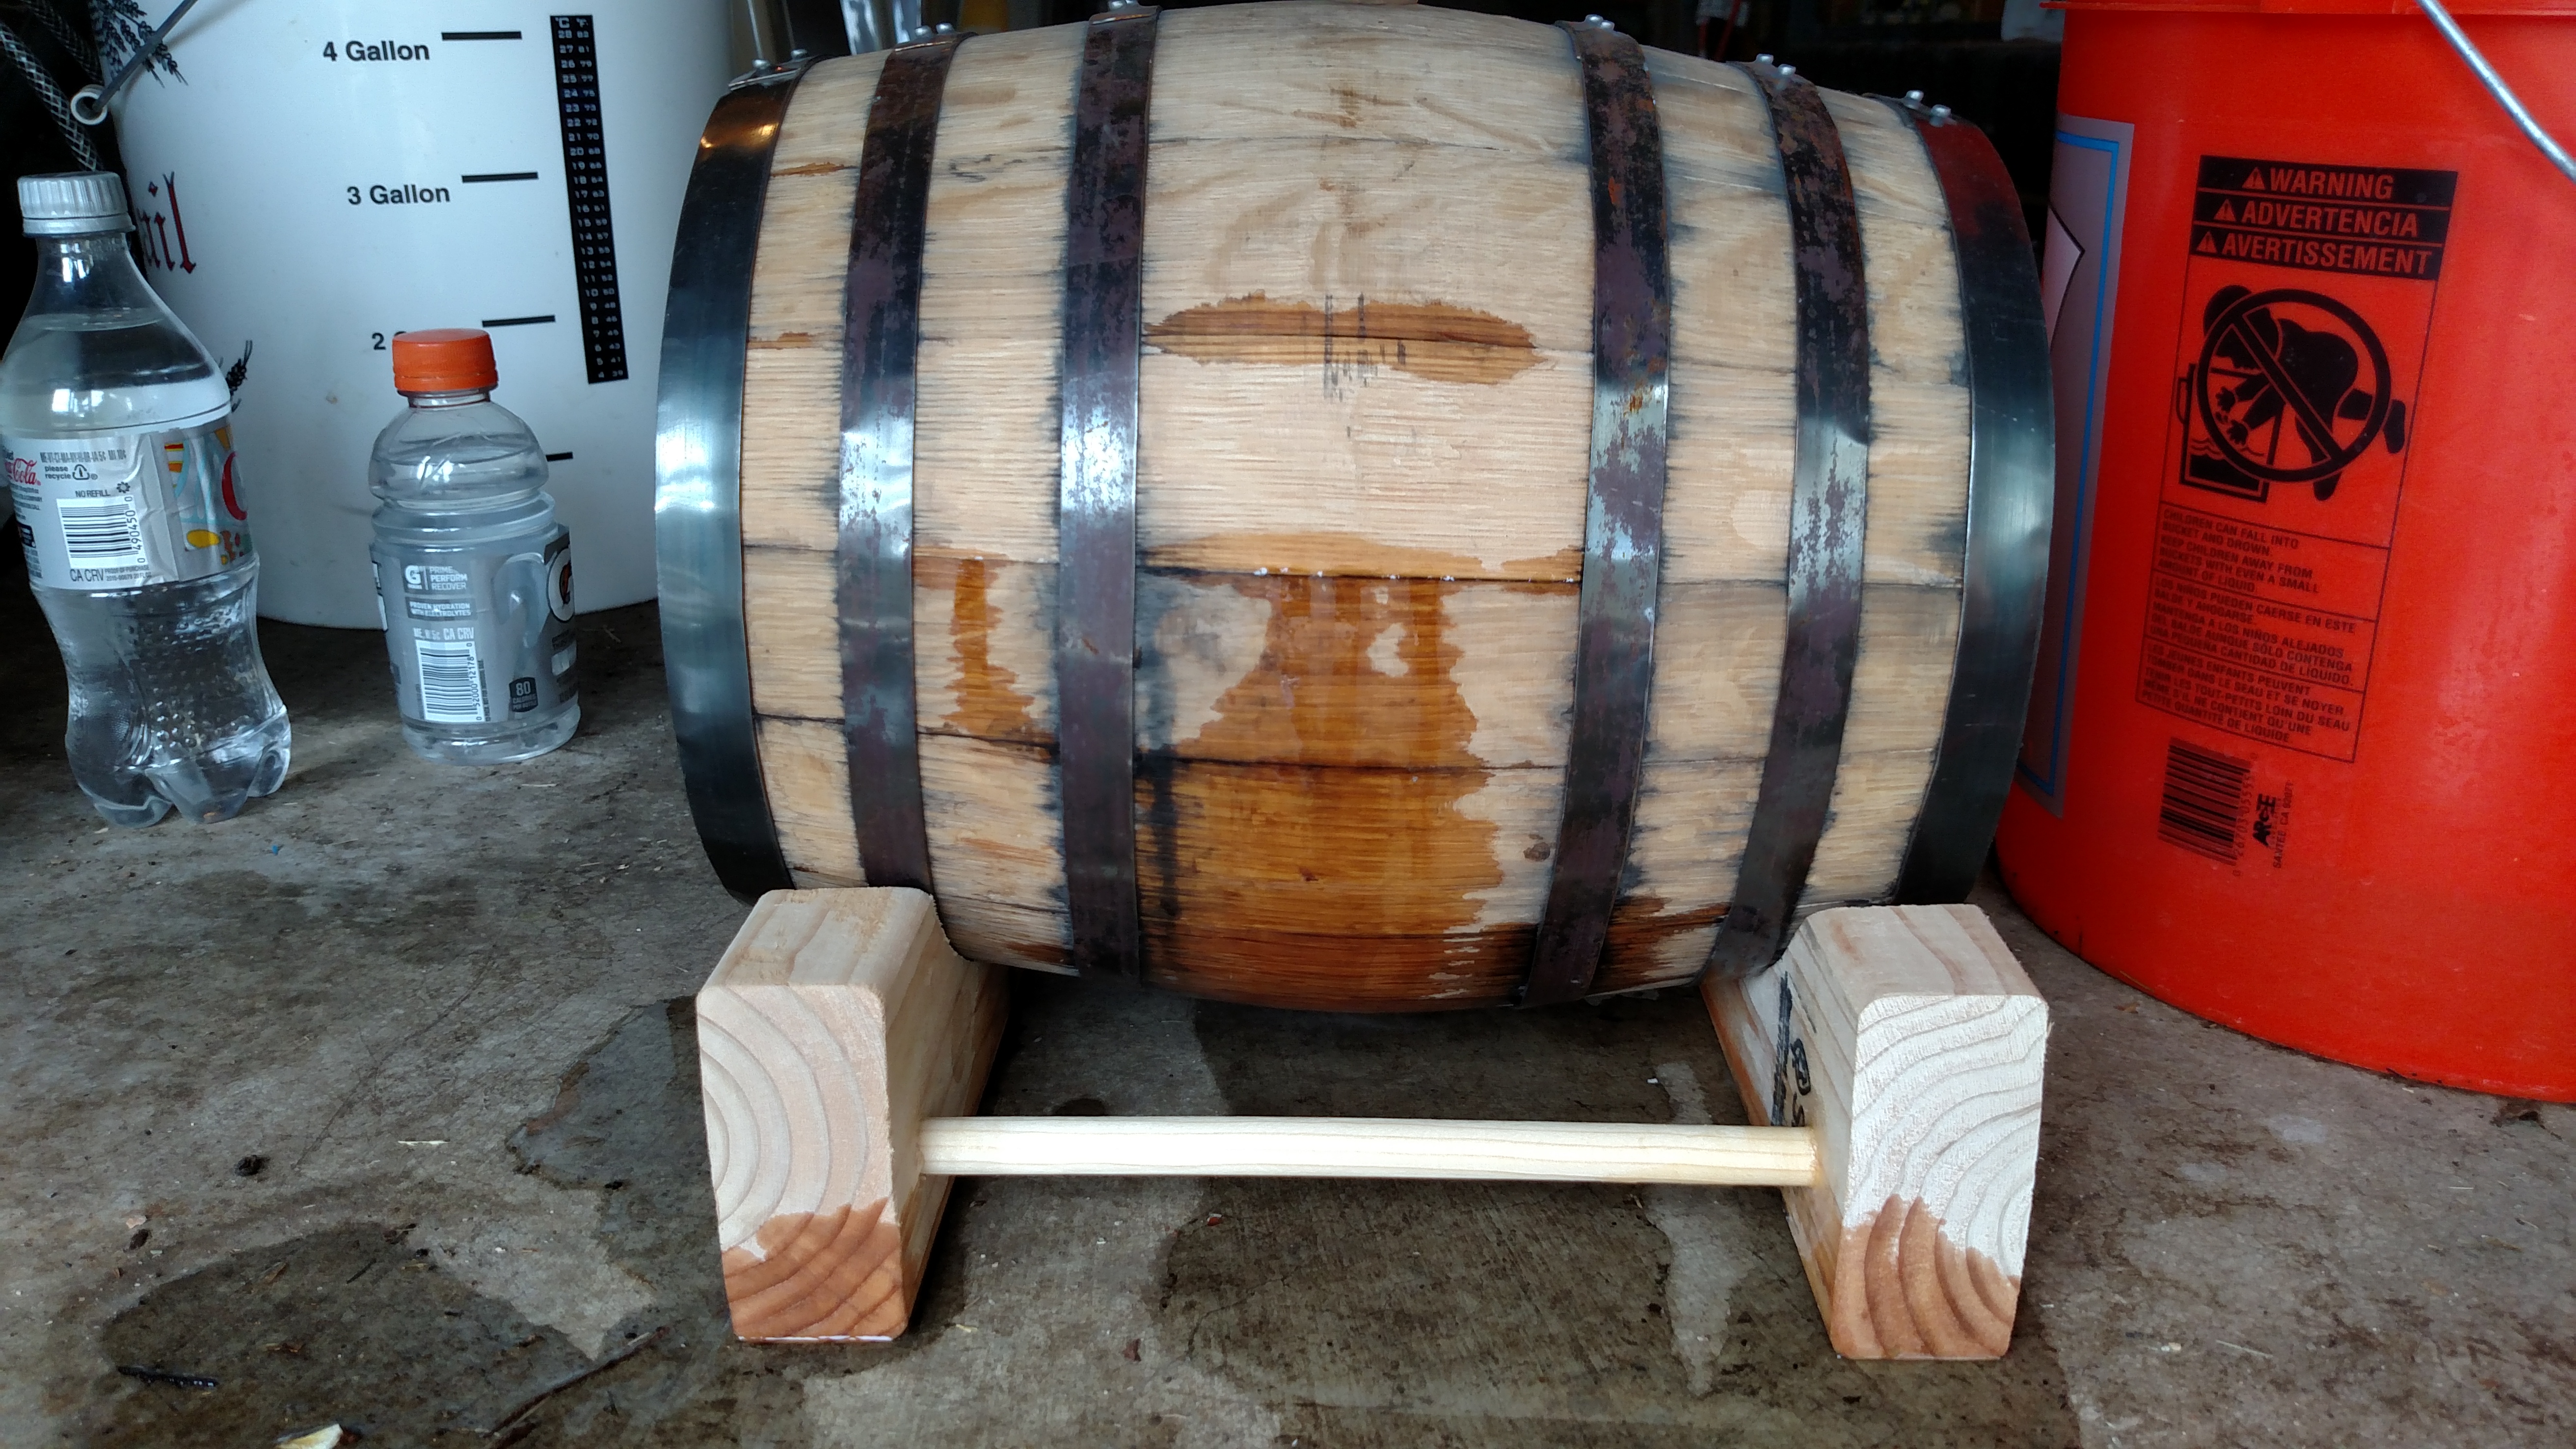
Let’s start with the siphon. Clearly from the picture above I was able to solve this one. The bunghole in the barrel is narrow. My autosiphon does not fit through the hole so I needed to just use a racking cane. I was trying to start the siphon with a sanitized turkey baster, but I could only get the beer to the top of the racking can before I ran out of suction from the baster. I ran out of time to fix this and the beer ended up sitting in the barrel for an extra day. I ended up just cutting about 6 inches off of the racking cane with a hacksaw and then I was able to easily start the siphon and get the beer out of the barrel.

So now on to the potential bigger issue: the bubbling airlock. I can only think of two things that could cause the airlock to bubble. The first is fluctuating temperature that is causing the pressure inside the barrel to change. The second is that fermentation has started again. Obviously of the two options the first is what I’m hoping happened. We have had some large temperature swings lately and a large change on the day I saw the airlock bubble. If fermentation started again then I likely have an infected barrel.

So if the barrel is infected what are my options to move forward from this batch? That question essentially paralyzed me for a couple hours. I saw four paths in front of me:

  1. Fill the barrel with the remaining imperial stout.
  2. Fill the barrel with the remaining imperial stout and add a sour culture.
  3. Brew a beer with the intention of making a sour beer to put in the barrel.
  4. Dispose of the barrel.

I am a homebrewer with my first barrel. I view this as a learning experience so I immediately removed option four. Sure I could waste some beer if I don’t get anything quality out of the barrel, but that’s ok. I’ll learn from it and do better if I ever get another barrel.

The next decision is whether I intentionally sour the barrel now or not, option 1 vs option 2/3. The plan for the barrel was to be soured when it becomes neutral or has diminished character. However, I assumed I would be able to put at least 2-3 batches through it before this happened. I think if I intentionally sour a potentially contaminated barrel that the culture I add would take over in the barrel. Seeing this Mad Fermentationist post about his Sour Bourbon Barrel Porter made me fee better about just going for it and souring the barrel. A beer like that is doable and designing a beer specifically for souring is obviously a solid contender. Intentionally souring the barrel seems like the safest route if in fact the barrel is contaminated, but that is still the big if.

What if there is nothing wrong with the barrel? What if I could have more delicious bourbon barrel aged stout? The current beer is not showing any signs of contamination, but it has only been a couple weeks and it is a strong flavored beer. The next batch of stout will be in there even longer to get the desired barrel character. Plenty of time for an infection to take over if the issue is present.

Despite souring the barrel now probably being the safest route, I decided to just stay the course. I want to get more clean bourbon barrel stout if I can. If I can’t then I’ll learn something from it. I can always add a sour culture to the barrel, but there is no coming back from that.

The barrel is currently filled with more stout. I’ll start checking it in 2-3 weeks to see how its doing. I’m currently excited and a little anxious for the next step in my barrel journey, but I’m confident that no matter how this batch turns out I’ll get something positive from the experience.

Preparing the Barrel

When I received the barrel it came with simple instructions: “Fill the barrel with boiling water for three hours, drain, and fill with beer.” That was easier said than done. I added water and watched it drain out all over my garage floor.

leaky_head leaky_barrel

I received the barrel 4 months before I was able to fill it.  Plenty of time for the staves to dry out. That doesn’t include how long it was empty prior to the barrel being sold. So now I have a dry leaky barrel that can’t fill with beer.

So I decided to try to force the barrel to be filled. The hot water should swell the staves. I boiled water and continued to attempt to fill the barrel to the top. The leaking continually slowed but did not stop over the following 24 hours. I was topping off the barrel at least every 2-3 hours except overnight.

The other thing I was trying was tapping on problem staves with a mallet. This was another solution that the internets taught me. How well this worked is unknown. But it did help me feel better as I smacked the barrel that would not let me put beer in it. I was nervous about hitting it too hard so I’m not sure if I did any real good with the mallet.

So I’m 24 hours in to trying to fill the barrel and I can’t stop the leak. The internet has not been helpful and I’m reduced to putting random words together that are related to barrels to try to find something to help me stop the leak. Finally I came across an article from WineMaker magazine. It contained tips for new barrels and used barrels and at least gave me something new to try.

The new technique consisted of filling the barrel about 20% full with hot, steamy water, shaking the barrel to get the steam to penetrate the staves, and setting the barrel on its end to swell the head of the barrel. Repeat for the other barrel head. If that doesn’t work then soak the barrel.

I was already soaking the barrel with only limited success so it seemed foolish not to try it. Before I could do this I needed to empty the barrel. The leak was slowing at this point so the barrel still contained about 2 gallons of water. As I emptied the barrel my garage immediately smelled like bourbon. All of this soaking was stripping the barrel of some of its bourbon character.

Thankfully this new technique finally sealed the barrel. I tested it again by filling it with water. Finally I could drain the barrel and fill it with beer! I had the Russian imperial stout ready in a keg and used my Blichmann beer gun to fill the barrel gently. Being in the barrel would introduce enough oxygen. I wanted to add the beer gently so I did not make the oxygen impact more dramatic.

filling_barrel

So if I had to do it over again I would do the following for barrel prep:

  1. Partial fill with hot, steamy water. Shake the barrel. Set on barrel head. Repeat for opposite head.
  2. Overnight soak with hot water if needed.
  3. For obvious gaps or large leaks in the staves try tapping the staves or bands with a rubber mallet.

Now the wait has begun. I lost some of my barrel character through long hot water soaks, but I’m confident that I will still end up with a delicious beer. If anything this may have made the barrel aging process less stressful. I was worried that with the small barrel size it could impart too quickly and become overbearing. After this ordeal I am going to relax and enjoy what the barrel brings.

Making Beer in 15 Minutes

As a dad with a 20 month old and one more on the way, time is a very scarce commodity for me. Brewing a beer can be a difficult thing to schedule. Carving out 5 consecutive hours can seem downright impossible among the craziness (yet joy) that children bring with them. So when I heard a Basic Brewing podcast about doing a beer in 15 minutes I was very interested.

The method revolves around a 15 minute boil. So overall the time will be more than 15 minutes, but it drastically reduces your brew time. The problem with a 15 minute boil is getting enough bitterness. So this method counts on hop bursting to provide bitterness and hop flavor and aroma in such a short time. In keeping with the theme of saving time you also use extract to save yourself the time of mashing.

I took one of my previous pale ale recipes and attempted to convert it to a 15 minute boil extract recipe fittingly dubbed “Lightning Pale Ale.” The recipe that I converted did call for dry-hopping. I intentionally did not dry hop for the first attempt because I wanted to see what the hop character would be from the 15 minute boil alone.

Recipe Specifications
--------------------------
Boil Size: 2.95 gal
Post Boil Volume: 2.86 gal
Batch Size (fermenter): 2.50 gal   
Bottling Volume: 2.50 gal
Estimated OG: 1.052 SG
Estimated Color: 10.6 SRM
Estimated IBU: 40.7 IBUs
Brewhouse Efficiency: 72.00 %
Est Mash Efficiency: 0.0 %
Boil Time: 15 Minutes

Ingredients:
------------
Amt                   Name                                     %/IBU         
3 lbs 8.0 oz          Amber Liquid Extract (12.5 SRM)          87.5 %        
8.0 oz                Wheat Liquid Extract (8.0 SRM)           12.5 %        
0.75 oz               Chinook [13.00 %] - Boil 15.0 min        22.9 IBUs     
1.00 oz               Centennial [10.10 %] - Boil 10.0 min     17.8 IBUs     
1.00 oz               Cascade [6.90 %] - Boil 0.0 min          0.0 IBUs      
1.0 pkg               Safale American  (DCL/Fermentis #US-05)            

The brew day for the beer went very smoothly. I was back in the kitchen for the first time in awhile and my wife quickly remembered all the reasons she was happy that I now brewed in the garage. From rounding up my equipment to being done with clean up was less than one and a half hours. That is less than 30% of the time I spend on an all grain batch on a normal brew day!

Unfortunately, this beer did not turn out as well as I had hoped. There is very minimal hop character currently present. The aroma is pretty sweet and malt forward.  I can pick up a slight pine note in the flavor, but I really have to focus to find it. The bitterness could also stand to be bumped up a bit, but it is actually close to where I would want it. This beer definitely could have been helped with the dry hop, but I think it needed some other help as well (more hops in the kettle).

Because this method of making beer relies on hop bursting and putting a lot of hops in the wort within that 15 minutes to get the right amount of bitterness it is limited to hop forward styles. Generally IPAs and pale ales will be the target for this method. However, I would be curious to play with some various hop extracts that could provide bitterness without flavor or aroma. Extracts could be the key to opening up different styles to the 15 minute boil. This is definitely a method I will be toying with in the future even though the first iteration did not work out as I hoped.

Planning for Problems

Over the past couple weeks I have been one of those times where I had bad luck if I had any luck at all.  Every simple task was made more difficult for no good reason.  A simple beer transfer that should take 20 minutes turned into a 3 day affair as I had to source replacements for equipment.  After a couple similar brewing issues in a week span I started to think about how I could avoid this problem in the future.  For me there are two areas that I am going to be working to improve.

The first is organization.  I have my space in the garage for my brew system and a space under the stairs for fermentation and storage.  Outside of these spaces I have equipment scattered in the basement and around a couple different sinks in the house.  This is a product of not having a true space in the garage to clean my equipment.  I need to have my brewing things in one place.  I also need to have bins for all of the small pieces like airlocks and stoppers.  Having better organization will not only help speed up my brewing tasks because I will not spend as much time looking for what I need, it will also help keep me aware of items that need attention.

The second area I am going to improve is eliminating single point failures in my homebrewery.  Basically, I need to stock spares.  I started doing this for beer dispensing earlier this year by getting a second CO2 tank.  It always seemed to happen that I would run out of CO2 on the day the homebrew shop was closed and I had friends coming over to enjoy some homebrew.  Now I always have spare CO2.  I need to extend this philosophy across the rest of my brewery.  I should have spare tubing for every size that I use in the brewery.  I should be swimming in air locks and stoppers.  Most of the items that I need spares for would only cost a few bucks to make it happen.  There is no reason to cause myself more pain by running out and not being able to transfer beer over $2 worth of tubing.

These changes are mostly about being prepared for when things go wrong.  Being prepared has become more important now that I have a son and another on the way.  My free time to do brewing tasks is now mostly at night.  I can no longer just stop what I am doing and head to the homebrew shop when I need something.  I need to be my own homebrew shop for common items.  By making these changes I should be able to remove some of the frustration when things go wrong.

Wort Chilling Methods

Following the boiling of your wort, the next step is to chill it down and prepare to ferment the beer. Every brewer has to chill their wort because if the yeast was added to near boiling wort it would not survive in that environment. Most ale yeasts are happiest around 68-70 degrees Fahrenheit. The faster the wort is cooled to the proper temperature and the yeast is added, the less likely the wort is to be inoculated by a wild yeast or bacteria.

Fast wort chilling forms what is called “cold break.” The cold break is a group of proteins that forced out of solution by the rapidly changing temperature. Forcing these proteins to precipitate out of the wort will protect the beer from developing chill haze. Chill haze is mostly a visual ‘defect.’ It will cause the beer to appear cloudy. However, it has been linked to long-term viability of the beer. So removing these proteins can help the beer last longer.

Here are some of the most common wort chilling methods, ranging from extreme low cost to more sophisticated set ups.

Ice Bath
An ice bath is the most basic method to chill wort.  It does not require any additional equipment. It is also the slowest method of chilling. The ice bath is as simple as the name suggests. Fill the sink or a tub with ice water and very carefully move the boil kettle into the ice bath. Gently stirring the ice water around the kettle can help speed up the cooling process. Be careful not to splash any of the water into the kettle as this could introduce contamination. Gently stirring the wort in a circular motion will also help speed things up. Be sure to use a sanitized spoon. I recommend stirring the bath and the wort in opposite directions. Otherwise the wort and ice bath will move together and negate some of the benefit of stirring.

Immersion Chiller
Stepping up to an immersion chiller is the most common first step for many homebrewers. The immersion chiller is the lowest cost option compared to the counterflow and plate chillers. As the name suggests this chiller is immersed in the boil kettle. Cold water is then run through the coils to cool the wort down. The water can come from a garden hose or the sink faucet. Make sure the chiller has the right connections for your situation when purchasing. The immersion chiller should be placed in the kettle with fifteen to twenty minutes remaining in the boil to sanitize the chiller. I recommend having the water source connected when placing the chiller in the wort. Similar to the ice bath, the wort can be gently stirred in a circular motion with a sanitized spoon to speed up the cooling process.

Counterflow Chiller
Counterflow chillers are coils with an interior and exterior coil. The wort is moved through the interior coil and cold water is moved through the outer coil. The wort could then be transferred directly into the fermenter or recirculated back into the kettle. Again the name is very descriptive because the wort and water run in opposite directions, counterflow. If the wort is connected to go in one side, the water should be connected to exit the chiller on that side and vice-versa. This design allows the chiller to take advantage of large temperature differences throughout the cycle which speeds up the chilling process. Because the wort needs to be moved through the chiller most brewers will use a pump. This adds to the cost of using this method  However, it would be possible to use gravity to drain the boil kettle into the chiller. To sanitize the chiller you can pump sanitizer through the inner beer coil or pump boiling water through it for 5-10 minutes. It is not necessary to sanitize the water side because the wort will not touch the inside of that coil.

Plate Chiller
Another creative name, plate chillers are a metal box with a series of thin metal plates on the inside of the box. Water is run through the chiller to cool the plates.  The wort is run through a different compartment and is cooled by the plates. Using plates increases the surface area and chills the wort more efficiently. This method also requires a way to move the wort, preferably a pump. Sanitize the plate chiller in a similar fashion to the counterflow chiller. Pump sanitizer or boiling water through the chiller prior to use. One downside of plate chillers is they can be difficult to clean. All of the plates provide a lot of nooks and crannies for hop matter or proteins to get stuck inside the chiller. Therefore it is important to flush the beer side of the chiller with water and a cleaning solution immediately after use.

No matter which method you choose, make sure you focus on the reason for this step in the process: to chill the wort as quickly as possible. Developing an over complicated process that doesn’t improve the speed of the wort chilling is just going to create more problems. One final reminder to be very careful with the beer after chilling!  Anything that touches the wort after this step needs to be sanitized prior to use.

How To: Brew Beer Using Extract

Brewing beer is simple. When people ask me how hard it is I tell them that if you can boil water, you can make beer. Sure there is a little more that goes into it, but not so much that it should be intimidating. Most brewers start out brewing malt extract. Malt extract is a condensed form of the sugars used in brewing. It comes in both liquid and dry forms. Using extract simplifies the brewing process because someone has already done part of the job for you: getting the sugar out of the malt. We will use a simple pale ale recipe as an example for this process. The general process is the same for any beer.

Be sure to read through the steps a couple times before you start your brew day. That way you won’t be surprised by anything you need to do.

Easy Drinking Pale Ale
8 lb gold liquid malt extract
1 oz Cascade hops (6% AA) 60 min
1 oz Cascade hops (6% AA) 20 min
1 oz Cascade hops (6% AA) 0 min
1 packet US-05 dry yeast

Brewing Process:

  1. Clean and sanitize your equipment. Follow the instructions on your sanitizer to mix a solution to the proper concentration.
  2. Heat 3.5 gallons of water to boil in a 5 gallon kettle.
  3. When the water is boiling, turn off the heat and stir in the malt extract. Stir well to avoid the extract dropping to the bottom of the kettle where it could burn.
  4. Turn on the heat and return the wort to a boil.
  5. When the wort starts boiling again, add your 60 minute hop addition (1 oz of Cascade hops) and start a timer for 60 minutes. The time next to the hops is the amount of time they spend in the boiling wort.  It is possible that the wort will foam up and boil over the side of the kettle within the next 10 minutes or so.  If the beer starts to foam up turn the heat down and stir until it subsides. You really want to pay attention to your kettle during this time. Cleaning up a boil over is not fun and a quick way to get kicked out of the kitchen when brewing beer.
  6. Continue your boil and add your hops at the proper times. For this recipe that is an ounce of Cascade at 20 minutes left and an ounce of cascade at 0 minutes left.
  7. Turn off the heat when the timer goes off and begin chilling the wort. There are many ways to chill the wort.  One inexpensive way is to just put the kettle in an ice bath in the sink. Be very careful moving the kettle while it is full of boiling wort. Another option is to use a copper immersion chiller. If you are using the immersion chiller, you need to put the chiller in the kettle with about 20 minutes left in the boil in order to sanitize the chiller.
  8. Chill the wort until it reaches 68 degrees Fahrenheit. Once the beer is chilled, make sure that everything that touches the beer is sanitized. No reason to risk letting your precious beer getting infected!
  9. While the wort is chilling, make sure your fermenter is sanitized and ready to receive your delicious wort.
  10. Transfer your wort to the fermenter. You can pour it in if you are using a bucket.  If you are using a carboy, you can still pour the wort into the fermenter but you will need to use a sanitized funnel to get the wort into the carboy.  I prefer to use a siphon to transfer the wort. Using a siphon is easier on your back and you do not have to worry about spilling the wort or dropping the kettle.
  11. Top off your wort with cool water until you reach a 5 gallon volume. Chances are your tap water won’t cause an infection. If you are concerned about infection you can boil water in advance and cool it in the fridge prior to adding it to the fermenter.
  12. Now it is time to pitch the yeast. Follow the instructions on the yeast packet to rehydrate the yeast and add to the fermenter. Technically you now have beer! Very weak beer.
  13. Put the lid or stopper in your bucket or carboy, respectively. Attach the airlock and fill it with a sanitizer like Star-San or cheap vodka.
  14. Store the fermenter in a cool dark place that will stay at a constant temperature (preferably 68 degrees Fahrenheit) for three weeks. Light will skunk the hops in the beer and ruin the flavor. Fluctuating temperatures can stress the yeast causing them to create off flavors in the beer and/or stop working before the beer is done.

Congratulations! You made beer! Now you need to have patience. Let the beer ferment fully. Don’t rush it. Too many beginning brewers will try to speed up the process and end up disappointed in the final product. Let the yeast do their thing and be rewarded with some tasty beer.

The Most Important Part of Brewing Beer

When I started this site, the first thing I imagined posting was a welcome message to the site for people to learn about what they will find here.  Or perhaps a step-by-step tutorial on how to homebrew.  That is what the people want to know!  I wrote the tutorial, and it will be coming soon.  However, I realized that I needed to take a step back to talk about what I think is the most important step in brewing: sanitation.

Sanitation and cleanliness are the most important aspects of brewing.  Some people will tell you that a good fermentation is more important, but a good fermentation won’t help you if your beer is infected.  It is more important that having a perfect recipe.  It is more important than any other topic that I will discuss on this website.  There is a reason that many professional brewers refer to themselves as glorified janitors.  They are focused on keeping everything clean.  If you do not properly clean and sanitize your equipment then nothing else matters.  You will introduce bacteria and other organisms that will spoil your beer.  If the beer is infected in the bottle, there is a chance the bottles could explode which creates a safety issue.

So sanitation is important, but here is the good news: it is easy.  Just mix up your cleaning solution to the specified concentration and soak your equipment.  I prefer using PBW when cleaning my equipment.  If you have some tough build up you can speed up the process with a soft sponge.  Do not use the scrubby side of the sponge because that will leave scratches in your equipment for bacteria to hide.  When your equipment is clean, prepare your sanitizer and soak your equipment again.  Simple as that.  My sanitizer of choice is Star San.  Most sanitizers only take a couple minutes to be effective.  Just remember: if it’s not clean, you can’t sanitize it.  If you have any build up on your equipment it won’t be sanitized because bacteria can live inside the gunk!

A clean brewery is a happy brewery.  Poor sanitation is one of the biggest causes for new brewers making bad beers.  It happened to me on my second batch and I almost stopped brewing.  Don’t be a statistic.  Be thorough and sanitize everything before you use it.  Make good sanitation a habit so you can focus on all the fun parts of making delicious beer.